Visit my Etsy Shop!

Showing posts with label crafts. Show all posts

Saturday, January 12, 2013

Chalkboard Paint

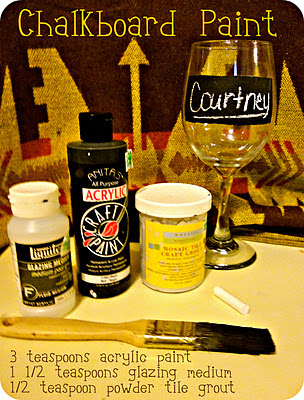
I painted wine glasses for name labels, they are hand washable in the sink:


Chalkboard Paint Recipe

Ingredients: 
3 teaspoons acrylic paint [colour of choice]
1 1/2 teaspoons glazing medium [water based]
1/2 teaspoon powder tile grout [Not Sanded]

Instructions:

Mix together all of the ingredients listed above, blend really well and that's it. You now have chalkboard paint! You should only mix as much as you will need for your project. It doesn't keep well, but can be stored in an air tight container for a few hours. You should do several coats. Wooden surfaces work the best to paint onto!
After a longer period of time, the paint will begin to thicken a little and become a bit brittle.


Helpful Hints:
Apply your paint with a regular paint brush and allow each coat of paint to dry completely, before applying the next. After each coat of paint, gently sand the paint with a 400 grit or higher grit sandpaper and wipe away any dust. This will help keep your painted surface nice and smooth.

You also need to condition your chalkboard, once you have finished painting. Be sure your paint is completely dry. Place a piece of chalk on the side and rub over the entire chalkboard surface, covering the entire area with chalk. Using a felt cloth, wipe off the chalk you just applied. With a slightly damp cloth, wipe the chalkboard clean.

Now your chalkboard paint is ready!

Thursday, March 22, 2012

Half Lace Scarf

I made this slightly altered t-shirt scarf for extremely cheap. I bought the XXXL t-shirt from Wal-Mart for $4. The lace I had as scrap from another project. 

You can find out how to make a tshirt scarf like the one below at this link.


I cut the piece of lace at the same width of the scarf. Then I cut one side of the lace creating just a regular scarf.


Then I hand sewed the lace in with white thread and did this again at the other end.


Then I had this wonderful infinity lace scarf...


When doubled over it creates one whole side of lace on the scarf.


Flowers and Lace Wreath

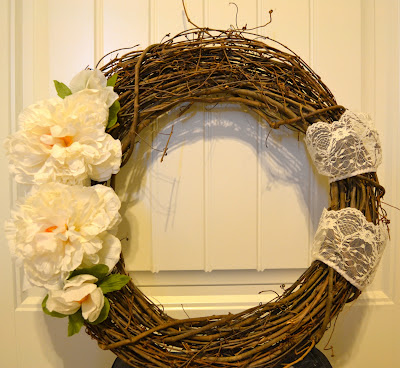
I made this wreath for $8 and it was so simple.


I took a plain wreath from Hobby Lobby...


Hot glued two small pieces of lace around one side....


And then cut the stems off some faux white flowers and hot glued them on.


All finished!

Wednesday, March 21, 2012

Gold Tack Wreath

I made this wreath out of Dollar Tree thumb tacks and a styrofoam wreath! The ribbon I already had from a different project so it all worked out.


Price: 
5 boxes of tacks - $5
Styrofoam Wreath - $2
=$7 wreath


I used a box that held 300 and used almost all of the boxes, that's almost 1500 tacks. 
I really lucked out finding them at Dollar Tree though, I might have paid twice that for 1500 if not.


I got the wreath from Michaels, cheap and durable!


Then started the hard part, I started around the edges and worked my way in. Every once in a while, a tack wouldn't stick well and I would fire up the hot glue gun to make sure they don't fall out!

15 minutes here, 5 minutes there, as time consuming as it is, if you space it out, it really wasn't a burden at all!


Then I just tied the back ribbon around and I'm convinced any color ribbon would work, I just happened to have this one!


Now I just enjoy my beautiful $7 gold tack wreath.


Saturday, December 24, 2011

Simple Stockings

I made these stockings out of spare fabric from another project about a year ago! I traced the pattern out of a 97 cent stocking from wal-mart and sewed the fabric with a simple straight stitch. Around the top of the stocking I hot glued a piece of crocheted lace for an added touch. With the lace on the top, I didn't even have to hem the top of the stocking. I took little pieces of the fabric and sewed in a loop to hang the stocking. 


Really simple and unique, you can make a stocking to match any decor. I added a glitter letter ornament to the top, hung through the loop, for my roommates first initial. Without a fireplace in my house, we improvised and used the tv stand as our "mantel". We also had a fun stocking exchange where we each put different things in each other's stockings!

I was able to make these really cheap: 
-The fabric I already had but was about $10 for 2 yards
-One roll of lace for $3
-Each ornament was less than $1


Wednesday, December 14, 2011

Christmas Card Cuteness

With Christmas coming around the corner, and many christmas cards coming in, where do you put them all without too much work on a display? I collected several different ways to display your cards without them piling up on your desk or kitchen table!

Simple ribbon strung across a window with keychain holder with ribbon:


Old shutters painted red with cards inserted in. Could also be used for mail for the rest of the year!

Tree with Christmas cards hung as ornaments:

Christmas cards hung on the garland on the staircase:

Taped or hung with a command tape on the wall in a shape (tree, star, etc.):

Old frame strung with lights and clothes pinned onto the light strand:

Don't let those Christmas cards pile up anymore! Use them as decoration for the holidays!

Tuesday, December 13, 2011

Dressing Up My Dresser


I used to have a plain white dresser and I really needed more color in my room. With a light blue and orange color scheme I knew I wanted to go with one of those colors. I will first start with several years ago when I got the dresser. Unfortunately I don't have any pictures from before I owned it, it was plain, ugly, unfinished wood. I painted it white with regular Behr Interior Eggshell Enamel from Home Depot.


Then after several years of boring, I decided to spice it up with some color. I am extremely unartistic when it comes to painting things, so painting was not the option for me. Instead I decided to Mod Podge my dresser. This idea would also work with scrapbook paper or tissue paper, but I decided to try something new and different. I Mod Podged fabric onto my dresser....
Things you'll need:
1. A Dresser
2. Mod Podge matte
3. Sponge brush
4. Screwdriver
5. Super Cute Fabric (I used a pretty thick orange and white fabric)

Steps to Mod Podge your dresser:

Step 1: Take everything out of your dresser, clothing, items, etc.
Step 2: Take the drawers out of the dresser, makes it easier to measure fabric.
Step 3: Take the handles or knobs out of the dresser drawer.
Step 4: Cut desired fabric into the shape of the front of your drawer (only the part seen when the drawer is closed) leaving a 1 inch margin around the edges.
Step 5: Using the sponge brush, paint the Mod Podge onto your dresser drawer. Do this step quickly and thoroughly because you need to stick the fabric to your drawer next.
Step 6: Place the fabric onto your dresser drawer and smooth out with your hands. Making sure the fabric is in any and all crevices.
Step 7: This step gets messy, so you might want to lay down a towel, newspaper, etc. Mod Podge over the fabric and make sure all corners are laying flat. Tuck the extra inch of fabric around the drawer and Mod Podge the corners very well. (Hint: You may have to hold it for a second while it dries a little in order to make it stick.)
Step 8: Let the drawer dry(20-30 minutes).
Step 9: Put handles back on, I used scissors to poke holes through to get the screws back in.
Step 10: Put the drawer back in its place and put back in items or clothing.

Mine turned out like this.


Looks like a painted dresser without the hassle of paint!!!!! Has a neat texture too!!!!!!