These children's pup tents are fun for play time and fold up into a flat and storable item. Can be put under a bed, or the back of a closet easily. Perfect for reading time, playing with others or a nap time! With enough space to lay inside of it, these tents have been a fun project to work on. Let me know how you like it. I eventually am looking at adding flaps and doors on these tents, but these tents are simple and fun! Pinterest has multiple tutorials. I am also opening an Etsy shop soon! Details to come!
Thursday, August 07, 2014
Thursday, May 22, 2014
Beach Towel Tote
I have been working on perfecting my beach towel tote bag. I hope that patience and my ever-improving sewing skills will make these totes every better. To start, here is the beach towel that can be rolled into tote bag and transported easily.
This first polka dot tote was only my second one to make. I hope to always be improving my strategies, I thought this one turned out great. The pocket is not perfect, but I hope to improve that aspect. The tote unfolds like below:
The full tote unfolds to a beach towel. The top part, the "pillow", is actually a velcro pocket. You can put in clothes, another towel, any other items that can be put away when lounging or hanging out on the beach.
This tote was my third, and my best so far. Everything quality-wise has improved. The velcro in the pillow section is more secure, the buttons are better placed, and the pocket on the front is a straighter line.
This one unfolds, same as the last.
This is how it looks rolled up. Not huge, so you could pack it in a suitcase, but also comfortable to carry if you have to walk a long way.
I love the way this one looks unfolded.
I love this tote! I hope it inspires you to DIY. Hopefully a tutorial to come soon!
Thursday, February 20, 2014
Children's Tents
A new venture sewing children's tents: there are lots of tutorials out there, but I love this one from Cakies: http://mycakies.com/2011/05/diy-a-frame-tent/. Enjoy!
Saturday, January 12, 2013
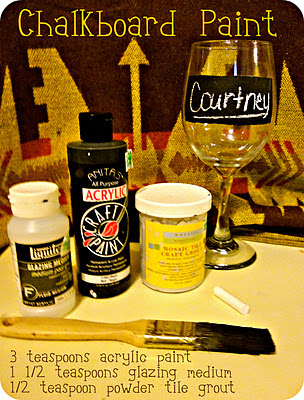
Chalkboard Paint
I painted wine glasses for name labels, they are hand washable in the sink:
Ingredients:
3 teaspoons acrylic paint [colour of choice]
1 1/2 teaspoons glazing medium [water based]
1/2 teaspoon powder tile grout [Not Sanded]
Instructions:
Mix together all of the ingredients listed above, blend really well and that's it. You now have chalkboard paint! You should only mix as much as you will need for your project. It doesn't keep well, but can be stored in an air tight container for a few hours. You should do several coats. Wooden surfaces work the best to paint onto!
After a longer period of time, the paint will begin to thicken a little and become a bit brittle.
Helpful Hints:
Apply your paint with a regular paint brush and allow each coat of paint to dry completely, before applying the next. After each coat of paint, gently sand the paint with a 400 grit or higher grit sandpaper and wipe away any dust. This will help keep your painted surface nice and smooth.
You also need to condition your chalkboard, once you have finished painting. Be sure your paint is completely dry. Place a piece of chalk on the side and rub over the entire chalkboard surface, covering the entire area with chalk. Using a felt cloth, wipe off the chalk you just applied. With a slightly damp cloth, wipe the chalkboard clean.
Now your chalkboard paint is ready!
Chalkboard Paint Recipe
Ingredients:
3 teaspoons acrylic paint [colour of choice]
1 1/2 teaspoons glazing medium [water based]
1/2 teaspoon powder tile grout [Not Sanded]
Instructions:
Mix together all of the ingredients listed above, blend really well and that's it. You now have chalkboard paint! You should only mix as much as you will need for your project. It doesn't keep well, but can be stored in an air tight container for a few hours. You should do several coats. Wooden surfaces work the best to paint onto!
After a longer period of time, the paint will begin to thicken a little and become a bit brittle.
Helpful Hints:
Apply your paint with a regular paint brush and allow each coat of paint to dry completely, before applying the next. After each coat of paint, gently sand the paint with a 400 grit or higher grit sandpaper and wipe away any dust. This will help keep your painted surface nice and smooth.
You also need to condition your chalkboard, once you have finished painting. Be sure your paint is completely dry. Place a piece of chalk on the side and rub over the entire chalkboard surface, covering the entire area with chalk. Using a felt cloth, wipe off the chalk you just applied. With a slightly damp cloth, wipe the chalkboard clean.
Now your chalkboard paint is ready!
Friday, December 21, 2012
Wine Bottle Sweaters
Cute little Dennis East International wine bottle gift cover!
Makes a bottle of wine more than just a gift!
Super cute wine and an easy, last minute gift!
I bought these two from my local grocery store!
Makes a bottle of wine more than just a gift!
Super cute wine and an easy, last minute gift!
I bought these two from my local grocery store!
Subscribe to:
Comments (Atom)


